How Create Your Own Private Storage Cloud in Your Garage
OwnCloud is a free open-source cloud storage which enables you to create a private cloud. ownCloud is a personal cloud storage solution similar to Dropbox, or Microsoft OneDrive.
The difference is that your files will be stored on your Ubuntu home cloud server instead of a server located in an unknown location somewhere in the world.
Advantages: No monthly payments, added security and unlimited files storage.
Video Tutorial:
Video Links:
Sign up for a No-IP account
1. Go to www.noip.com website.
2. Then click on the “Sign Up” button.

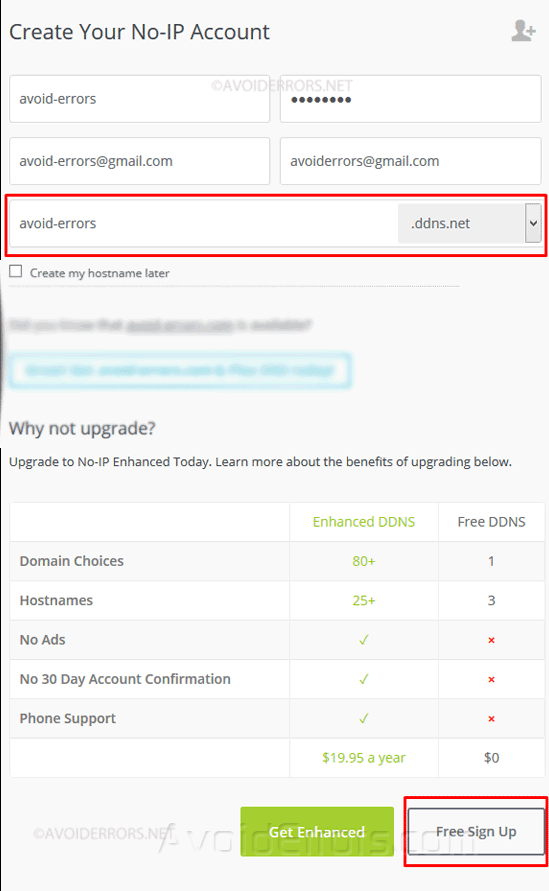
3. Fill out the contact information and click on “free signup” button at the bottom of the page.
During the set up process, choose a hostname without special characters. This hostname will become the web address that will be associated with your account. You’ll be sent an email confirmation to activate your account.
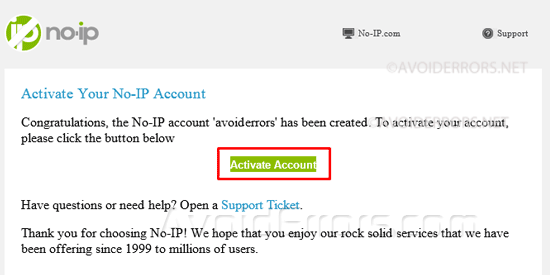
4. Open your email to activate your account.
Install the No-IP Client in Ubuntu
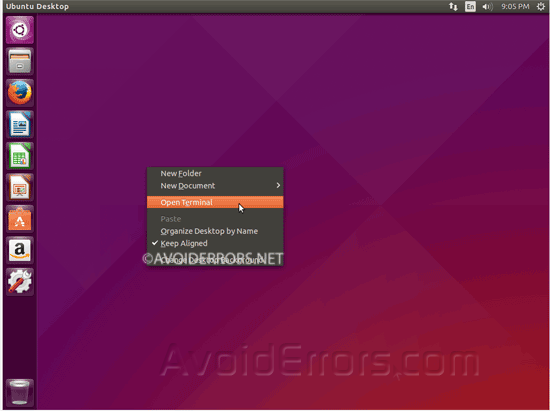
1. On your Ubuntu 15.04 open Terminal. To do so right click on the desktop and select Open Terminal.
2. Copy and paste each command line into terminal in order. Be sure to hit the “Enter” key on your keyboard to execute each command.
1. sudo -s
2. cd /usr/local/src/
3. wget http://www.no-ip.com/client/linux/noip-duc-linux.tar.gz
4. tar xf noip-duc-linux.tar.gz
5. cd noip-2.1.9-1/
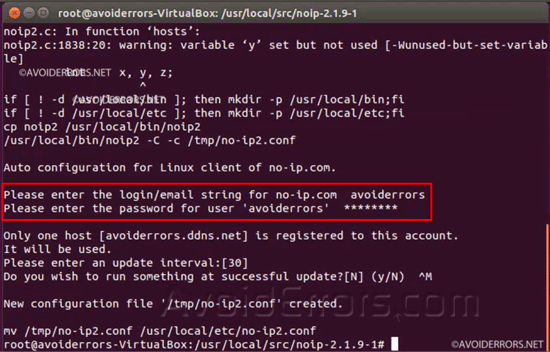
6. make install
3. Once you enter the last line you will be prompted for your No-IP username and password. There will also be additional prompts, hit the “Enter” key on your keyboard to leave the default settings.
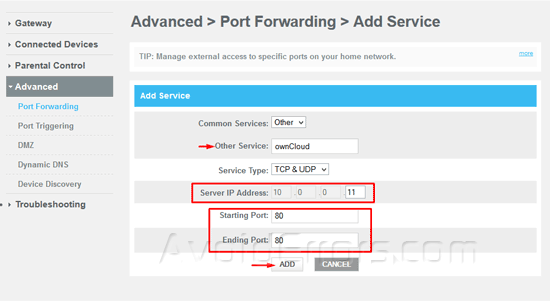
Setup Port forward on your Router
We need to setup a Port forwarding rule so that when you are accessing your server from outside your home, your router can direct your connection to the right computer.
1. Open the terminal and enter the following command:
ifconfig
2. Locate the IP address of the Ubuntu server, it should look something like: 192.x.x.x or 10.x.x.x
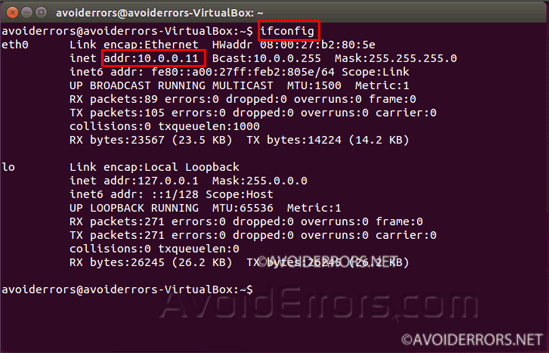
3. Log in to your Router. Port forward port 80 to the Ubuntu server. In my tutorial my IP address 10.0.0.11 so the configuration is as follows:
Note: The Port forward feature is found on all routers.
Install ownCloud 8 on Ubuntu 15.04
1. On the Ubuntu server, open a web browser and visit ownCloud.org
2. Click on the “Download” button on the top right corner of the page.

3. In the “Get Started” section, click on the “Packages For auto updates” tab. The one with the penguin icon on it.
4. Then click on “Continue” button at the bottom corner.

5. You’ll get Install Package screen. Here you’ll get the necessary commands to install ownCloud. They are not in order. Execute each command in the order of the numbers I placed to the left. In step seven I placed them in proper order so you can copy and paste it from there if you want.
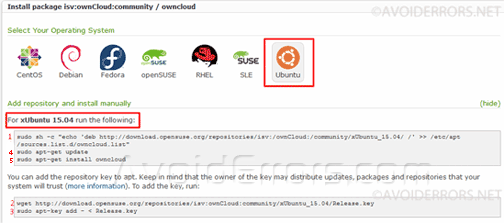
6. On your Ubuntu 15.04 open Terminal. To do so right click on the desktop and select Open Terminal.
7. Copy and paste the commands into Terminal. Hit the “Enter” key on the keyboard after each command:
1. sudo sh -c “echo ‘deb http://download.opensuse.org/repositories/isv:/ownCloud:/community/xUbuntu_15.04/ /’ >> /etc/apt/sources.list.d/owncloud.list”
2. wget http://download.opensuse.org/repositories/isv:ownCloud:community/xUbuntu_15.04/Release.key
3. sudo apt-key add – < Release.key
4. sudo apt-get update
5. sudo apt-get install owncloud
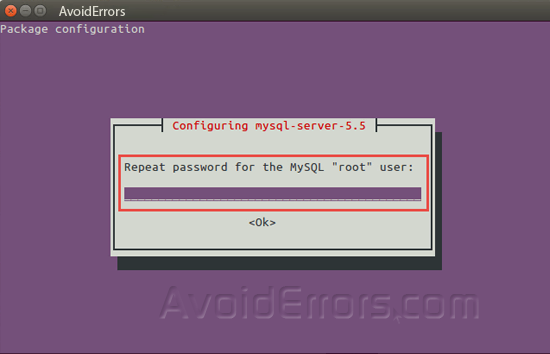
8. During the install process, mySQL will require to create a “root” (admin) user password. Enter a password and confirm re-typing the password on the subsequent screen:

9. Once the text stops moving in Terminal, go to the web browser and enter your hostname address adding “/owncloud.” It should look something like this, “http://avoiderrors.ddns.net/owncloud”
10. You will be prompted to create admin account and password.
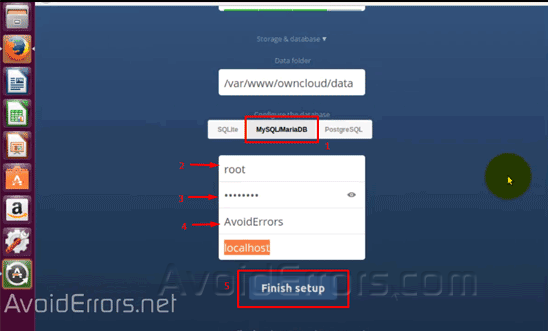
11. Then Click on Storage & database drop-down.

12. From the drop-down options select “MySQL/MariaDB.” in the middle for the database.
13. Type “root” for the Database user.
14. Enter the password created in step 8 in the Database password
15. Choose a name for the database in Database name section
16. Then click “Finish Setup” button at the bottom.
17. The next page will be an ownCloud popup providing links to different syncing apps for PC, Android and iOS.
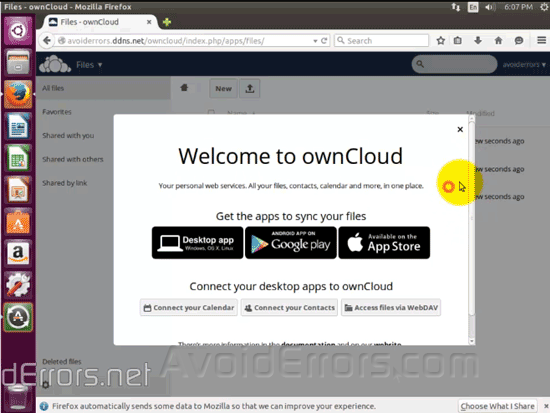
18. Your ownCloud installation is now complete!
Now that ownCloud 8 server setup is complete, ownCloud is now accessible from any computer with an internet access. You can also access or sync your mobile devices to ownCloud from any mobile device using the free Android or iOS apps.
Errors
If you encounter the following error:
Cannot write into “apps” directory

Then enter the following command in the terminal:
sudo chown www-data:www-data -R /var/www/owncloud
Refresh the web browser and you will be prompted with ownCloud page. Then continue with step 10.


