How to Install Niresh Yosemite on VirtualBox
Do you want to try out newest Yosemite apple OS on a PC? OK then lets show you how to install Niresh Yosemite on VirtualBox so follow all the steps carefully.
The PC you’re going to be using using needs to be an Intel dual core processor 64bit with at least 4GB of ram, and at least 10GB free of HDD space.
1. First download VirtualBox, also download the extension pack.

2. Go to hackintosh.zone downloads page and download the Niresh Yosemite iso.zip. Once downloaded extract it and double click on the extracted file.

Additionally you would need BitTorrent client to download the 5 GB file. This process can take a while.

3. Now open virtual box and create a new machine by clicking New on top left corner.

4. Then assign a name, make sure that Mac OS X (64 bit) is selected as follows:

5. Now assign some ram to the virtual machine, 2GB is the minimum that you can assign.

6. Create a “virtual hard drive” for the virtual machine. Virtualbox will ask you what type of drive you want to create just choose VDI (VirtualBox Disk Image), Dynamically allocated drive. Then assign more than 10GB to that hard drive.

7. Then select your newly created virtual machine and click Settings.

8. Once the settings open up, go to System and uncheck the “Enable EFI” box.

9. Also go to Display and assign 128MB for Video Memory.

10. Once you’re done with that, still in the settings go to Storage, in the storage box, you will see a CD icon saying Empty. Select it and click on Choose a virtual CD/DVD disk file and browse to choose the Niresh Yosemite.iso fom Hackintosh Zone. then click on OK to close the settings.

NOTE: For Haswell processor or for newer processor bought since 2013 you would need to trick VirtualBox into thinking that is an older model processor. To do this open the command prompt as admin
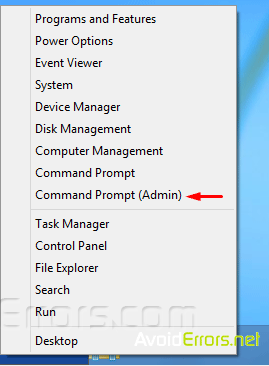
and type the following command:
cd “C:\Program Files\Oracle\Virtualbox”
Once in the VirtualBox directory enter the following command:
VBoxManage modifyvm “Name of virtual machine” –cpuidset 00000001 000306a9 00020800 80000201 178bfbff
Replace “Name of virtual machine” with the name of your virtual machine as shown on the image underneath (no quotation marks). You can find the name of your VM in the left side of the Virtualbox main window.

11. Start up your virtual machine. You will come up to the Yosemite Zone boot screen.

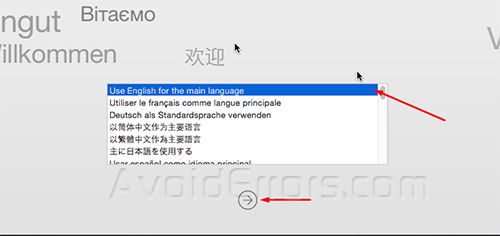
12. When the welcome screen comes up select your main language and click next.
13. Then on the next screen go to Utilities > Disk utility…

14. Then Select your disk and go to Erase tab in the Format: select “Mac OS Extended (Journaled)” from the drop down then name it and click Erase.

15. Close the disk utility and then select the new created disk and click customize.

16. In there uncheck : Install Audio Drivers (Kexts) and Install Network Drivers (Kexts) and Graphics -> GraphicsEnabler=Yes. Then press continue to continue the installation.

17. Restart your virtual machine, and eject the Yosemite Zone ISO file from your virtual DVD drive. To do this, right-click on the CD icon at the bottom right of the Virtualbox window, and un-check the Yosemite Zone.

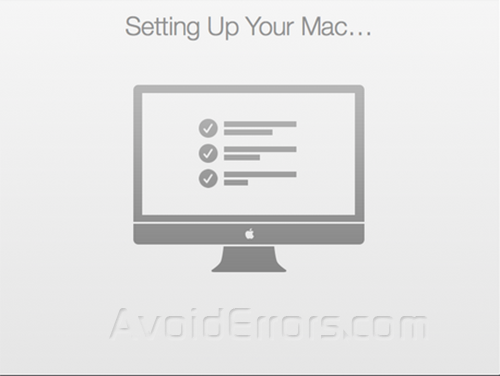
18. OS X Yosemite will now start. This will take anywhere from 30 seconds to 15 minutes, depending on your computer’s hardware. Then just fill out your personal information and your done!


Thank you very much! Works in Aug 2016.
It failed to boot using .iso in VirtualBox 5+, but works fine in VirtualBox 4.3.38
Same for me too.
Win 10, VirtualBox 4.3.38 and YosemiteZone.
Also, I had issues using my SSD as the VDI location.
The message is appearing: “Fatal: No bootable medium found system halted.” Help!
try installing Sierra: https://www.avoiderrors.com/?p=31333